Audi A5 8W Auto Hold retrofit

In order to have your AutoHold retrofit, you will need to buy Auto Hold switch [4M1927143] and wiring harness. I bought my switch from bm-parts.nl and the harness from Aliexpress. You can also make your own harness, of course.

Once you have your parts ready, you can start running wires and connecting.

Your AH switch [E540] has 4 pins which needs to connect to;

1- Front Electronics Unit [J519] : B-31
2- Handbrake button [E540] : PIN-6 (GROUND)
3- Front Electronics Unit : [J519] A-17
4- Handbrake button [E540] : PIN-5 (+)

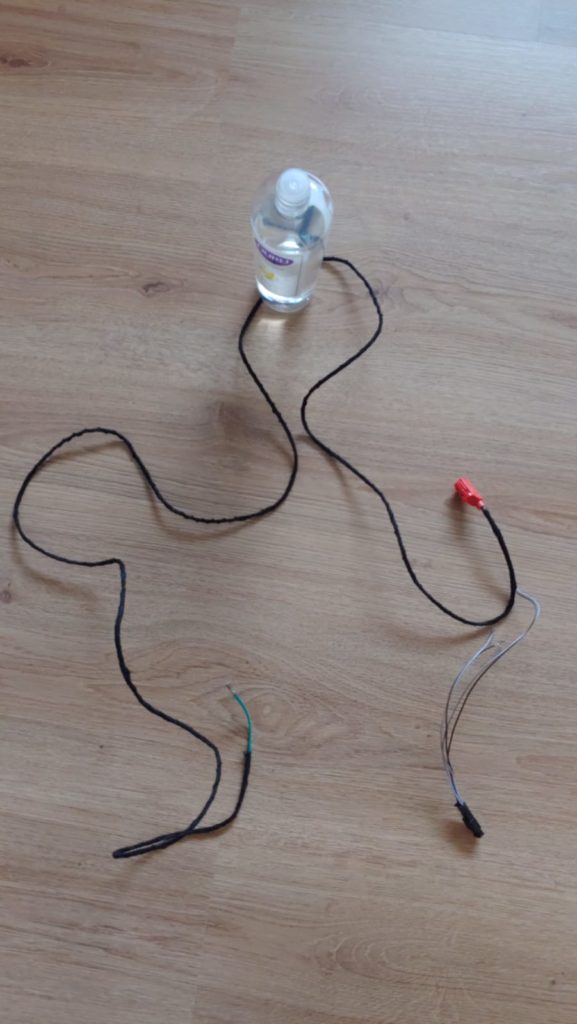
Cabling will look like this

Coding is a bit tricky. Use VCDS to code like below;
– Module 9 Byte 15 Bit 6 is set from 0 to 1
– Module 3 Byte 18 Bit 6 is set from 0 to 1
– Module 3 Byte 30 Bit 1 is set from 0 to 1
If your car doesn’t have Adaptive Cruise Control, these will work just fine. With ACC, I used ODIS-E to do the coding, since VCDS cannot calculate binary and update checksum correctly. If you are new to ODIS-E, you will need to have au49 workspace and its files in order to code properly.

Here is the result

f30 wing mirror retrofit notes

Retrofitting dimming and folding mirrors requires 2 cables to passenger mirror.  LIN bus and power.

Old mirror pin layout (6 pins)

  1. Mirror Heating  –> not used
  2. Turn Indicator –> Pin 2
  3. Ground –> Pin 3
  4. Vertical Adjustment –> not used
  5. Ground –> Pin 4
  6. Horizontal Adjustment –> not used

New mirror pin layout (5 pins)

  1.  Empty
  2. Turn Indicator
  3. Turn Indicator Ground
  4. Ground (heating and folding)
  5. LIN bus
  6. Power

I’ve connected LIN from A173*4B Pin 27 which was already empty. I ran the cable to the mirror. And for power I used the rear fuse box. The missing ground cable is connected to pin 3.

Driver’s side is plug and play.  Install your new mirror and window switch.

After finishing connections add 430 to FA and code FEM VO.

Enjoy.

trigger AWS Lambda function from S3 to windows with AWS SSM

Preparations;

– create your lambda, and connect trigger from s3 as shown below.
– grant permissions for your lambda. (use the key icon on the left)


– After installing SSM Agent to your Instance, grant AmazonSSM rights to your instance.

Action in python;

#09-03-2018 – Cem Dogan
import boto3
import json

def lambda_handler(event, context):
records = [x for x in event.get(‘Records’, []) if x.get(‘eventName’) == ‘ObjectCreated:Put’]
sorted_events = sorted(records, key=lambda e: e.get(‘eventTime’))
latest_event = sorted_events[-1] if sorted_events else {}
info = latest_event.get(‘s3’, {})
file_key = info.get(‘object’, {}).get(‘key’)
bucket_name = info.get(‘bucket’, {}).get(‘name’)
command = ‘C:\folder\your_PSscript.ps1 ‘ + file_key
print command
ssm = boto3.client(‘ssm’)
ssmresponse = ssm.send_command(InstanceIds=[‘i-instanceID’], DocumentName=’AWS-RunPowerShellScript’, Parameters= { ‘commands’: [command] } )
return ssmresponse

file_key will have the name of the file uploaded to s3 bucket. And bucket_name has the name of the bucket. You can pass these values as argument to your PS script. You can create an s3 put test example and test your code.


collecting SSL expiration information

This small function gathers expiry information from an SSL certificate and calculates days remaining until expire. You may query multiple domains by calling get_cert_exp function in a loop.

Enjoy!

<?php

function get_cert_exp($url){
$orignal_parse = parse_url($url, PHP_URL_HOST);
$get = stream_context_create(array(“ssl” => array(“capture_peer_cert” => TRUE)));
$read = stream_socket_client(“ssl://”.$orignal_parse.”:443″, $errno, $errstr, 30, STREAM_CLIENT_CONNECT, $get);
$cert = stream_context_get_params($read);
$certinfo = openssl_x509_parse($cert[‘options’][‘ssl’][‘peer_certificate’]);

//$expired= getdate($certinfo[validTo]);
$end=($certinfo[validTo]);
$end=substr($end, 0, -1); //remove last char from string
$chunks = str_split($end, 2);
//Convert array to string. Each element separated by the given separator.
$expire_date = implode(‘:’, $chunks);
$expire_date=’20’.$expire_date;

// Days left to expire date //
$gd_a = getdate( $certinfo[‘validTo_time_t’] );
$gd_b = getdate( time() );

$a_new = mktime( 12, 0, 0, $gd_a[‘mon’], $gd_a[‘mday’], $gd_a[‘year’] );
$b_new = mktime( 12, 0, 0, $gd_b[‘mon’], $gd_b[‘mday’], $gd_b[‘year’] );

$days_left=round( abs( $a_new – $b_new ) / 86400 );
// end of calculation //
if ($days_left <= 50 ) {
$days_left=”<b><font color=red>”.$days_left.”</font></b>”;
}else{
$days_left=”<b><font color=green>”.$days_left.”</font></b>”;
}

echo “SSL Certificate of <b> $url </b>is valid until “.$expire_date.'</br>’;
echo “Days remaining until expiration : “. $days_left.'</br>’;
}


get_cert_exp(“https://your.nice.expiring.domain/”);

?>

collecting IBM v7000 and Netapp storage information with PHP

I wrote this small code for our early morning checks to see the summary of IBM v700 and Netapp storage systems.

This simply collects Failed Disks, Aggregates, Volumes and battery status information and Alerts of each system for managerial reports on request. Or, can be situated at intranet portal.

Enjoy!

<?php
include_once(‘header.php’); //here you have session and menu information
//
//20-01-2016 – Cem DOGAN
//
// Report all PHP errors
#error_reporting(E_ALL);
//required php libraries for ssh connection. php net_ssh2
set_include_path(‘lib/’);
include(‘Net/SSH2.php’);
include(‘File/ANSI.php’);

$filer_username=”YOUR-READ-ONLY-USER”;
$filer_password=”YOUR-PASSWORD”;

function Visit_ssh($server, $username, $password, $command) {

#echo $server, $username, $password, $command;

$ssh = new Net_SSH2($server);
if (!$ssh->login($username, $password)) {
return (‘Login Failed’);
}
else {
return $ssh->exec($command);
}
}

/////////////////////////////////
//IBM v7000 Part /
/////////////////////////////////

$v7000_ip = array(
“AMS-SV7-01″=>”10.104.1.183”,
“DUS-SV7-01″=>”10.104.14.110”,
);


foreach($v7000_ip as $x => $x_value){
echo ‘<h6><u>’.$x.’ ‘.$curdate.’ : </u></h6>’;
echo ‘<pre>’;
echo “<u>Pool Usage;</u></br>”;
$filer_result=Visit_ssh($x_value, $filer_username, $filer_password, “lsmdiskgrp -delim :”);
// echo $filer_result;

$lines = explode(PHP_EOL, $filer_result); //put every line into array
$lines=array_filter($lines); //clean empty array objects

$line_counter=0;
$line_count=count($lines);
echo ‘<table>’;
foreach ($lines as $line) {
$item= explode(‘:’, $line);
echo ‘<tr>’;
if ($line_counter == 0) {
//display table header
echo “<th>$item[0]</th>”;//id
echo “<th>$item[1]</th>”;//name
echo “<th>$item[2]</th>”;//status
echo “<th>$item[5]</th>”;//capacity
echo “<th>$item[7]</th>”;//free capacity
echo “<th>$item[15]</th>”;//compression active

} else {
// table content
echo “<td>$item[0]</td>”;
echo “<td>$item[1]</td>”;
echo “<td>”;
if (preg_match(‘/online/’,$item[2])) {
echo “<b><font color=green>$item[2]</font></b>”;
}else {
echo “<font color=red>”.$item[2].”</font>”;
}
echo “</td>”;
echo “<td>$item[5]</td>”;
echo “<td>$item[7]</td>”;
echo “<td>$item[15]</td>”;
}
echo ‘</tr>’;
$line_counter++;
}
echo ‘</table>’;

echo “<u>Battery Status;</u> </br>”;
$filer_result=Visit_ssh($x_value, $filer_username, $filer_password, “lsenclosurebattery -delim :”);

$lines = explode(PHP_EOL, $filer_result); //put every line into array
$lines=array_filter($lines); //clean empty array objects

$line_counter=0;
$line_count=count($lines);
echo ‘<table>’;
foreach ($lines as $line) {
$item= explode(‘:’, $line);
echo ‘<tr>’;
if ($line_counter == 0) {
//display table header
echo “<th>$item[0]</th>”;//enclosure_id
echo “<th>$item[1]</th>”;//battery_id
echo “<th>$item[2]</th>”;//status
echo “<th>$item[3]</th>”;//charging_status
echo “<th>$item[4]</th>”;//recondition_needed
echo “<th>$item[5]</th>”;//percent_charged
echo “<th>$item[6]</th>”;//end_of_life_warning

} else {
// table content
echo “<td>$item[0]</td>”;
echo “<td>$item[1]</td>”;
echo “<td>”;
if (preg_match(‘/online/’,$item[2])) {
echo “<b><font color=green>$item[2]</font></b>”;
}else {
echo “<font color=red>”.$item[2].”</font>”;
}
echo “</td>”;
echo “<td>$item[3]</td>”;
echo “<td>$item[4]</td>”;
echo “<td>$item[5]</td>”;
echo “<td>$item[6]</td>”;
}
echo ‘</tr>’;
$line_counter++;
}
echo ‘</table>’;

echo “<u>Alert(s);</u> </br>”;
$filer_result=Visit_ssh($x_value, $filer_username, $filer_password, ‘lseventlog -filtervalue “status=alert” -fixed no -delim :’);

$lines = explode(PHP_EOL, $filer_result); //put every line into array
$lines=array_filter($lines); //clean empty array objects

$line_counter=0;
$line_count=count($lines);
echo ‘<table>’;
foreach ($lines as $line) {
$item= explode(‘:’, $line);
echo ‘<tr>’;
if ($line_counter == 0) {
//display table header
echo “<th>$item[0]</th>”;//sequence_number
echo “<th>$item[1]</th>”;//last_timestamp
echo “<th>$item[2]</th>”;//object_type
echo “<th>$item[3]</th>”;//object_id
echo “<th>$item[4]</th>”;//object_name
echo “<th>$item[6]</th>”;//status
echo “<th>$item[7]</th>”;//fixed
echo “<th>$item[10]</th>”;//description

} else {
// table content
echo “<td>$item[0]</td>”;
echo “<td>$item[1]</td>”;
echo “<td>$item[2]</td>”;
echo “<td>$item[3]</td>”;
echo “<td>$item[4]</td>”;
echo “<td>”;
if (preg_match(‘/alert/’,$item[6])) {
echo “<b><font color=red>$item[6]</font></b>”;
}
echo “</td>”;

echo “<td>”;
if (preg_match(‘/no/’,$item[7])) {
echo “<b><font color=red>$item[7]</font></b>”;
}
echo “</td>”;
echo “<td>$item[10]</td>”;
}
echo ‘</tr>’;
$line_counter++;
}
echo ‘</table>’;


echo ‘</pre>’;
}
/////////////////////////////////
//NetApp Part /
/////////////////////////////////

$storage_ip = array(
“ASD-FILER-A10A”=>”10.104.102.14”,
“ASD-FILER-A20A “=>”10.104.102.10”,
“ASD-FILER-A20B “=>”10.104.102.12”,
“DUS-FILER-A10A “=>”10.104.14.214”,
“DUS-FILER-A20A “=>”10.104.14.210”,
“DUS-FILER-A20B “=>”10.104.14.212”,
);


foreach($storage_ip as $x => $x_value){
echo ‘<h6><u>’.$x.’ ‘.$curdate.’ : </u></h6>’;
echo ‘<pre>’;
echo “<u>Failed disks;</u></br>”;
$filer_result=Visit_ssh($x_value, $filer_username, $filer_password, “vol status -f”);
if (preg_match(‘/empty/’,$filer_result)){
$filer_result = preg_replace( “/\r|\n/”, “”, $filer_result );
echo $filer_result.” -<b><font color=green> OK</font></b></br>”;
}
else {
echo “<font color=red>”.$filer_result.”</font>”;
}


echo “<u>Aggregates;</u> </br>”;
$filer_result=Visit_ssh($x_value, $filer_username, $filer_password, “df -Ah”);

$pattern=”snap”;
$lines = explode(PHP_EOL, $filer_result);
$exclude = array();

foreach ($lines as $line) {
if (strpos($line, ‘snap’) !== FALSE) {
continue;
}
preg_match(‘/(\d{2,3})\%/’,$line,$s_line); //match percentages
$s_line=array_filter($s_line); //clean empty array
if ( $s_line[1] >= 95 ) {
$line=str_replace($s_line[0],”<b><font color=red>”.$s_line[0].”</font></b>”,$line);
}
else {
$line=str_replace($s_line[0],”<b><font color=green>”.$s_line[0].”</font></b>”,$line);
}
$exclude[] = $line;
}
echo implode(“\n”, $exclude);
echo “<u>Volumes;</u> </br>”;
$filer_result=Visit_ssh($x_value, $filer_username, $filer_password, “df -h”);

$pattern=”snap”;
$lines = explode(PHP_EOL, $filer_result);
$exclude = array();

foreach ($lines as $line) {
if (strpos($line, ‘snap’) !== FALSE) {
continue;
}
preg_match(‘/(\d{2,3})\%/’,$line,$s_line); //match percentages
$s_line=array_filter($s_line); //clean empty array
if ( $s_line[1] >= 95 ) {
$line=str_replace($s_line[0],”<b><font color=red>”.$s_line[0].”</font></b>”,$line);
}
else {
$line=str_replace($s_line[0],”<b><font color=green>”.$s_line[0].”</font></b>”,$line);
}
$exclude[] = $line;
}
echo implode(“\n”, $exclude);


echo “<u>Environment;</u> </br>”;
$filer_result=Visit_ssh($x_value, $filer_username, $filer_password, “environment chassis”);

$lines = explode(PHP_EOL, $filer_result);
$exclude = array();

foreach ($lines as $line) {
preg_match(‘/ok/’,$line,$s_line); //match word
$s_line=array_filter($s_line); //clean empty array
if ( isset($s_line[0])) {
$line=str_replace($s_line[0],”<b><font color=green>”.strtoupper($s_line[0]).”</font></b>”,$line);
}
else{
$line=str_replace($s_line[0],”<b><font color=red>”.strtoupper($s_line[0]).”</font></b>”,$line);
}
$exclude[] = $line;
}
echo implode(“\n”, $exclude);


echo ‘</pre>’;
}

?>
Monitoring Paloalto firewall status by XML API

I wrote this small code for our early morning checks to see the summary of firewalls.

In order to make it working, create a read only user on Device -> Administrators. Then create your API key by following steps described here.

Enjoy!

<?php
include_once(‘header.php’); //here you have session and menu information
// 17/03/2015 Cem DOGAN
// Report all PHP errors
error_reporting(E_ALL);
// Set timezone
#date_default_timezone_set(‘Europe/Amsterdam’);

//proxy information if any. if you have proxy authentication you can enable $proxyauth here
$proxy_ext = ‘10.104.100.13:3128’;
//$proxyauth = ‘user:password’;

function Visit_pa($url,$proxy){
// echo “url : “.$url.” proxy : “.$proxy.”<br/>”;
$ch = curl_init();
curl_setopt($ch, CURLOPT_URL,$url);
if ($proxy == 1){
curl_setopt($ch, CURLOPT_PROXY, $proxy_ext);
}
//curl_setopt($ch, CURLOPT_PROXYUSERPWD, $proxyauth);
curl_setopt($ch, CURLOPT_FOLLOWLOCATION, 1);
curl_setopt($ch, CURLOPT_RETURNTRANSFER, 1);
//curl_setopt($ch, CURLOPT_HEADER, 1);
curl_setopt($ch, CURLOPT_SSL_VERIFYPEER, 0);
curl_setopt($ch, CURLOPT_CAPATH, “./cacert.pem”);
$curl_scraped_page = curl_exec($ch);
//echo curl_error($ch).”<br/>”;
curl_close($ch);
return $curl_scraped_page;
}
// Palo Alto systems check – OVERWIEW
//this section displays general overview of PaloAlto Firewall.
//key value is your API Key generated before
$pa_status1 = Visit_pa(“https://your.nice.paloalto.url/api/?type=op&cmd=%3Cshow%3E%3Chigh-availability%3E%3Cstate%3E%3C%2Fstate%3E%3C%2Fhigh-availability%3E%3C%2Fshow%3E&key=YOUR-API-KEY-HERE”);


$pa_status1 = new SimpleXMLElement($pa_status1);
echo ‘<h6><u>Palo Alto ‘.$curdate.’ : </u></h6><pre>’;
echo ‘<u>PA-Model:</u> ‘.$pa_status1->result->group->{‘local-info’}->{‘platform-model’};
echo ‘<u> Management IP:</u> ‘.$pa_status1->result->group->{‘local-info’}->{‘mgmt-ip’};
echo ‘<u> State:</u> ‘.$pa_status1->result->group->{‘local-info’}->{‘state’};
echo ‘<u> Sync:</u> ‘.$pa_status1->result->group->{‘local-info’}->{‘state-sync’};
echo ‘<br/>’;
echo ‘<u>PA-Model:</u> ‘.$pa_status1->result->group->{‘peer-info’}->{‘platform-model’};
echo ‘<u> Management IP:</u> ‘.$pa_status1->result->group->{‘peer-info’}->{‘mgmt-ip’};
echo ‘<u> State:</u> ‘.$pa_status1->result->group->{‘peer-info’}->{‘state’};
echo ‘<br/>’;
echo ‘<u> Running Sync:</u> ‘.$pa_status1->result->group->{‘running-sync’};
echo ‘<br/>’;

// Palo Alto systems check – SYSTEM CRITICAL LOGS –
//this section checks PA critical logs and displays if any in defined time period.
$days_ago = 3;
$pa_days = date(“Y/m/d%20H:m:s”, ( time( ) – 86400 * $days_ago) );
$days_ago = date(“d-m-Y”, ( time( ) – 86400 * $days_ago) );

$pa_status2 = Visit_pa(“https://your.nice.paloalto.url/api/?type=log&log-type=system&query=(%20severity%20eq%20critical%20)%20and%20(%20receive_time%20geq%20%27$pa_days%27%20)&key=YOUR-API-KEY-HERE”);
$pa_status2 = new SimpleXMLElement($pa_status2);
$pa_status2 = $pa_status2->result->{‘job’};
$pa_status2 = Visit_pa(“https://your.nice.paloalto.url/api/?type=log&action=get&job-id=$pa_status2&key=YOUR-API-KEY-HERE”);
$pa_status2 = new SimpleXMLElement($pa_status2);
$pa_log_count= $pa_status2->result->log->{‘logs’}[count];
echo ‘<u>PA-log count:</u> ‘.$pa_log_count.'<br/>’;
if ($pa_log_count > 0 ) {
echo “PA-system critical logs since $days_ago<br/>”;
$pa_logs=$pa_status2->result->log->logs;
for ($i = 0; $i < $pa_log_count; $i++) {
echo “<u>Seq no: </u>”.$pa_logs->entry[$i]->seqno
.” – <u>Type: </u>”.$pa_logs->entry[$i]->type
.” – <u>Subtype: </u>”.$pa_logs->entry[$i]->subtype
.” – <u>Time: </u>”.$pa_logs->entry[$i]->time_generated
.” – <u>Event ID: </u>”.$pa_logs->entry[$i]->eventid
.” – <u>Opaque: </u>”.$pa_logs->entry[$i]->opaque.”<br/></pre>”;
}
}
else {
echo “<font color=green>No critical log(s) found on PA systems since $days_ago”.”</font></pre>”;

}

?>

F30 dimming mirror retrofit notes

  • Locate your rain sensor, behind the mirror.

  • take out the pins of your dimming mirror.

  • connect cables according to table below.

Rain sensor;

PIN Type Color
1 + Red/White
2 LIN Violet/Grey
3 Ground Brown/Black

Mirror;

PIN Type Color
3 + Red
6 LIN Black/White
10 Ground Brown
  • Coding is required.

Without VO;

FEM_BODY;
FEM_01 > PfInternalMirror 3120 > ISP_EC = aktiv
FEM_01 > PfInternalMirror 3120 > ISP_KOMPASS = nicht_aktiv
FEM_01 > PfInternalMirror 3120 > LIN_ISP_VERBAUT = aktiv
FEM_01 > PfInternalMirror 3120 > PF_INMI_LIN_VAR = ISP_g_EC

VO;
FEM with 431 option

redirecting all HTTP requests to HTTPS by RedirectMatch

Apache’s Redirect directive may not help you if you are using multiple server-names if you want to redirect all HTTP requests to SSL. In this case you can use RedirectMatch directive which doesn’t have enough example on its documentation. By adding this line just below your ServerName definition in your httpd.conf, you may easily do redirection. Enjoy!

RedirectMatch “http://(.*)” “https://$1”

mod_rewrite is still a powerful alternative, so;

RewriteEngine On
RewriteCond %{HTTPS} off
RewriteRule (.*) https://%{HTTP_HOST}%{REQUEST_URI}

installing weblogic 12c plugins for apache 2.4.x with cluster configuration

Edit your hosts file;

[root@oracle-linux WLS-http-plugin]# more /etc/hosts
127.0.0.1   localhost localhost.localdomain localhost4 localhost4.localdomain4 oracle-linux cluster.test.wls
::1         localhost localhost.localdomain localhost6 localhost6.localdomain6
192.168.122.189	cluster.test.wls

Install apache web server;

[root@oracle-linux ]# yum install httpd
[root@oracle-linux ]# httpd -v
Server version: Apache/2.4.6 (Red Hat)
Server built:   Jul 23 2014 04:34:53

Download Oracle WebLogic Web Server Plug-Ins 12c from Oracle website : http://www.oracle.com/technetwork/middleware/webtier/downloads/index-jsp-156711.html
Extract the downloaded archive and find (correct file according to your architecture) mod_wl_24.so and copy into /etc/httpd/modules/ folder.

Create weblogic config file for apache;

more /etc/httpd/conf.d/httpd-weblogic.conf
LoadModule weblogic_module /etc/httpd/modules/mod_wl_24.so

  WebLogicCluster cluster.test.wls:7003,cluster.test.wls:7005
  Debug ON
 # WLLogFile             /home/wls/httpd-logs/WL.log
 # WLTempDir             /tmp/
  DebugConfigInfo       On
  KeepAliveEnabled ON
  KeepAliveSecs  15


  SetHandler weblogic-handler
  WebLogicCluster cluster.test.wls:7001


#PlanExampleWeb is a cluster example application, which can be downloaded from Oracle website.

  SetHandler weblogic-handler
  WebLogicCluster cluster.test.wls:7003,cluster.test.wls:7005

Check your apache configuration with apachectl;

[root@oracle-linux ]# apachectl configtest
[Fri Oct 03 17:27:30.221327 2014] [weblogic:warn] [pid 2593] The Debug directive is ignored.  The web server log level is used instead.
Syntax OK

If everything is fine, start your httpd and connect to your weblogic console without port definition;

http://cluster.test.wls/console/login/LoginForm.jsp

Weblogic 12.1.3 silent mode installation

First of all update your linux distribution to latest version, and create user/group which is required for installation.

[root@oracle-linux ~]# yum update
[root@oracle-linux ~]# groupadd wls
[root@oracle-linux ~]# useradd -g wls wls
[root@oracle-linux ~]# passwd wls
[root@oracle-linux ~]# su - wls
-bash-4.2$ umask 027

Download Weblogic installation file from Oracle website : http://www.oracle.com/technetwork/middleware/weblogic/downloads/wls-main-097127.html
Download jdk from Oracle website : http://www.oracle.com/technetwork/java/javase/downloads/index.html

Prepare oraInst.loc;

-bash-4.2$ more /etc/oraInst.loc 
inventory_loc=/home/wls/oraInventory/
inst_group=wls

Prepare Response File;

-bash-4.2$ more response.file.rsp 
[ENGINE]
#DO NOT CHANGE THIS.
Response File Version=1.0.0.0.0
[GENERIC]
#The oracle home location. This can be an existing Oracle Home or a new Oracle Home
ORACLE_HOME=/home/wls/12.1.3.0
#Set this variable value to the Installation Type selected. e.g. WebLogic Server, Coherence, Complete with Examples.
INSTALL_TYPE=WebLogic Server
#Provide the My Oracle Support Username. If you wish to ignore Oracle Configuration Manager configuration provide empty string for user name.
MYORACLESUPPORT_USERNAME=
#Provide the My Oracle Support Password
MYORACLESUPPORT_PASSWORD=
#Set this to true if you wish to decline the security updates. Setting this to true and providing empty string for My Oracle Support username will ignore the Oracle Configuration Manager configuration
DECLINE_SECURITY_UPDATES=true
#Set this to true if My Oracle Support Password is specified
SECURITY_UPDATES_VIA_MYORACLESUPPORT=false
#Provide the Proxy Host
PROXY_HOST=
#Provide the Proxy Port
PROXY_PORT=
#Provide the Proxy Username
PROXY_USER=
#Provide the Proxy Password
PROXY_PWD=
#Type String (URL format) Indicates the OCM Repeater URL which should be of the format [scheme[Http/Https]]://[repeater host]:[repeater port]
COLLECTOR_SUPPORTHUB_URL=

Check wls user settings and edit .bash_profile;

-bash-4.2$ id
uid=1001(wls) gid=1001(wls) groups=1001(wls) context=unconfined_u:unconfined_r:unconfined_t:s0-s0:c0.c1023

-bash-4.2$ more .bash_profile 
export WL_HOME=/home/wls/12.1.3.0/wlserver/
export CONFIG_JVM_ARGS="-Djava.security.egd=file:/dev/./urandom"

Fix the file paths according to your system and Install Weblogic;

/usr/java/jdk1.8.0_20/bin/java -jar -d64 /home/wls/fmw_12.1.3.0.0_wls.jar -silent -invPtrLoc /etc/oraInst.loc -responseFile /home/wls/response.file.rsp

After successful installation create domain, following steps below using WLST;

-bash-4.2$ pwd
/home/wls/12.1.3.0/wlserver/common/bin
-bash-4.2$ ./commEnv.sh 
-bash-4.2$ ./wlst.sh 
Java HotSpot(TM) 64-Bit Server VM warning: ignoring option MaxPermSize=256m; support was removed in 8.0

Initializing WebLogic Scripting Tool (WLST) ...

Welcome to WebLogic Server Administration Scripting Shell

Type help() for help on available commands

wls:/offline> readTemplate('/home/wls/12.1.3.0/wlserver/common/templates/wls/wls.jar')
wls:/offline/base_domain>cd('Servers/AdminServer')
wls:/offline/base_domain/Server/AdminServer>set('ListenAddress','')
wls:/offline/base_domain/Server/AdminServer>set('ListenPort', 7001)
wls:/offline/base_domain/Server/AdminServer>create('AdminServer','SSL')
Proxy for AdminServer: Name=AdminServer, Type=SSL
wls:/offline/base_domain/Server/AdminServer>cd('SSL/AdminServer')
wls:/offline/base_domain/Server/AdminServer/SSL/AdminServer>set('Enabled', 'True')
wls:/offline/base_domain/Server/AdminServer/SSL/AdminServer>set('ListenPort', 7002)
wls:/offline/base_domain/Server/AdminServer/SSL/AdminServer>cd('/')
wls:/offline/base_domain>cd('Security/base_domain/User/weblogic')
wls:/offline/base_domain/Security/base_domain/User/weblogic>cmo.setPassword('weblogic1')
wls:/offline/base_domain/Security/base_domain/User/weblogic>setOption('OverwriteDomain', 'true')
wls:/offline/base_domain/Security/base_domain/User/weblogic>writeDomain('/home/wls/12.1.3.0/user_projects/domains/test')

closeTemplate()
exit()

After creating domain, you will have startup scripts ready. Run the scripts and follow the screen output;

 
cd ~/12.1.3.0/user_projects/domains/test/bin/
./startWebLogic.sh & 
./startNodeManager.sh &

Use your web browser to reach the admin console, after startup;
http://192.168.122.189:7001/console/

Enjoy!